
Course: Cloud Computing Security
This project is a hands-on lab for deploying and securing a self-hosted Nextcloud instance on CentOS Stream 9 using Apache, MariaDB, and PHP. It walks through installation, configuration, enabling HTTPS with a self-signed certificate, and practical troubleshooting steps (permissions and SELinux contexts) that commonly break Nextcloud setups in real environments. ⚙️🔧
It then explores and compares three data-protection approaches in a cloud-storage context: Nextcloud server-side encryption, client-side encryption by encrypting files with GPG before upload, and end-to-end encryption (E2EE) using protected folders from the Nextcloud client. The lab includes verification steps to confirm what remains unreadable on the server at rest versus what can be decrypted and accessed by the legitimate user. 🔐☁️✅
Objective
Practice and compare Nextcloud encryption models—server-side encryption, client-side encryption (GPG before upload), and end-to-end encryption—by verifying what is readable on the server versus on the client.
Part I - Install and Configure Nextcloud (CentOS Stream 9)
Target platform: CentOS Stream 9 server
Service stack: Apache + MariaDB + PHP + Nextcloud
1) Install Apache (httpd)
Update the system and install Apache:
sudo dnf update -y
sudo dnf install httpd -y
sudo systemctl enable httpd
sudo systemctl start httpd
Test server access from a browser:
- URL:
http://IP_SERVER
Optional: Open firewall for HTTP/HTTPS (CentOS)
If your Windows host cannot reach the VM over HTTP/HTTPS:
sudo firewall-cmd --add-service=http --permanent
sudo firewall-cmd --add-service=https --permanent
sudo firewall-cmd --reload
2) Install and Configure MariaDB
Install and start MariaDB:
sudo dnf install mariadb-server -y
sudo systemctl enable mariadb
sudo systemctl start mariadb
Secure MariaDB installation (set root password, remove anonymous users, remove test DB):
sudo mysql_secure_installation
Create Nextcloud database and user:
sudo mysql -u root -p
Inside MariaDB:
CREATE DATABASE nextcloud;
CREATE USER 'nextclouduser'@'localhost' IDENTIFIED BY 'motdepassfort';
GRANT ALL PRIVILEGES ON nextcloud.* TO 'nextclouduser'@'localhost';
FLUSH PRIVILEGES;
EXIT;
3) Install PHP 8.2 and Required Extensions
Enable Remi repository and install PHP + extensions:
sudo dnf install epel-release -y
sudo dnf install https://rpms.remirepo.net/enterprise/remi-release-9.rpm -y
sudo dnf module reset php -y
sudo dnf module enable php:remi-8.2 -y

sudo dnf install -y \
  php php-cli php-mysqlnd php-gd php-xml php-mbstring php-curl php-intl php-zip \
  php-bcmath php-pecl-imagick

sudo systemctl restart httpd
4) Install and Configure Nextcloud
Download and extract Nextcloud:
cd /var/www/html

sudo curl -o nextcloud.zip https://download.nextcloud.com/server/releases/latest.zip
sudo dnf install unzip -y
sudo unzip nextcloud.zip

sudo chown -R apache:apache nextcloud
sudo chmod -R 755 nextcloud
Create the Apache VirtualHost configuration file:
sudo vi /etc/httpd/conf.d/nextcloud.conf
# or: sudo nano /etc/httpd/conf.d/nextcloud.conf
Add the following configuration (replace IP_SERVER with your server IP):
<VirtualHost *:80>
    ServerAdmin admin@localhost
    DocumentRoot /var/www/html/nextcloud
    ServerName IP_SERVER

    <Directory /var/www/html/nextcloud/>
        AllowOverride All
        Require all granted
    </Directory>

    ErrorLog /var/log/httpd/nextcloud_error.log
    CustomLog /var/log/httpd/nextcloud_access.log combined
</VirtualHost>
Restart Apache:
sudo systemctl restart httpd
Then:
- Open Nextcloud in your browser
- Create the administrator account
5) Common Nextcloud Setup Errors (Permissions)
These errors typically occur because Apache (user apache on CentOS) cannot write to required Nextcloud directories.
5.1) Setup/Login page error (config directory)
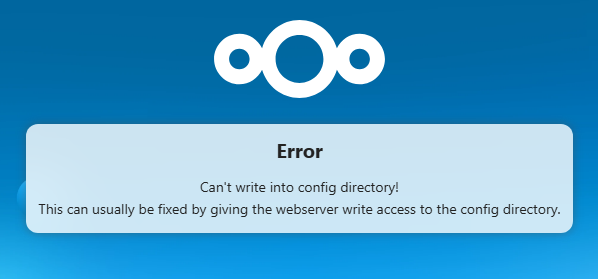
Fix permissions:
cd /var/www/html
sudo chown -R apache:apache nextcloud
sudo find nextcloud/ -type d -exec chmod 750 {} \;
sudo find nextcloud/ -type f -exec chmod 640 {} \;
sudo chmod 750 nextcloud/config
Restart Apache:
sudo systemctl restart httpd
5.2) Setup error (data directory)
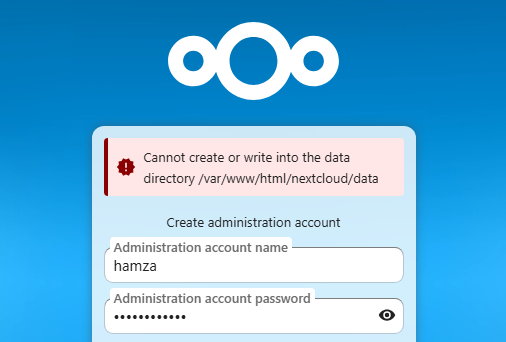
Create the data directory and set permissions:
cd /var/www/html

# create the data directory
sudo mkdir -p nextcloud/data

# make apache the owner of all Nextcloud files
sudo chown -R apache:apache nextcloud

# Fix permissions on the data directory:
sudo find nextcloud/ -type d -exec chmod 750 {} \;
sudo find nextcloud/ -type f -exec chmod 640 {} \;
sudo chmod 750 nextcloud/data
If SELinux is enforcing:
sudo semanage fcontext -a -t httpd_sys_rw_content_t '/var/www/html/nextcloud/data(/.*)?'
sudo restorecon -Rv /var/www/html/nextcloud/data
Restart Apache:
sudo systemctl restart httpd
After this, the installer should accept the admin account and continue.
5.3) “Apps” page internal server error (apps directory)
Fix permissions:
cd /var/www/html

# make sure Apache owns all Nextcloud files
sudo chown -R apache:apache nextcloud

# directories 750, files 640 is fine
sudo find nextcloud/ -type d -exec chmod 750 {} \;
sudo find nextcloud/ -type f -exec chmod 640 {} \;

# ensure apps directory is writable by apache
sudo chmod 750 nextcloud/apps
If SELinux is enforcing:
sudo semanage fcontext -a -t httpd_sys_rw_content_t '/var/www/html/nextcloud/apps(/.*)?'
sudo restorecon -Rv /var/www/html/nextcloud/apps
Restart Apache:
sudo systemctl restart httpd
6) Enable HTTPS (Self-Signed Certificate)
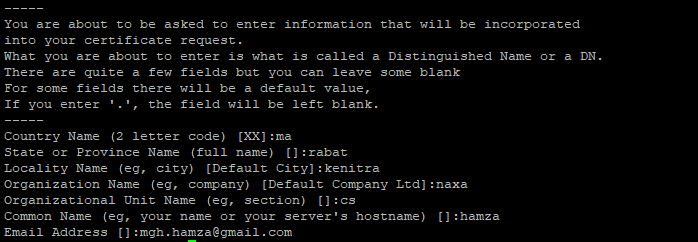
Generate a self-signed certificate:
sudo openssl req -x509 -nodes -days 365 -newkey rsa:2048 \
  -keyout /etc/pki/tls/private/nextcloud.key \
  -out /etc/pki/tls/certs/nextcloud.crt
Entering certificate request details:
Update /etc/httpd/conf.d/nextcloud.conf to redirect HTTP to HTTPS and enable SSL:
<VirtualHost *:80>
    ServerAdmin admin@example.com
    DocumentRoot /var/www/html/nextcloud
    ServerName IP_SERVER

    # Redirect all HTTP to HTTPS
    Redirect permanent / https://IP_SERVER/
</VirtualHost>

<VirtualHost *:443>
    ServerAdmin admin@example.com
    DocumentRoot /var/www/html/nextcloud
    ServerName IP_SERVER

    # Self-signed SSL certificate
    SSLEngine on
    SSLCertificateFile /etc/pki/tls/certs/nextcloud.crt
    SSLCertificateKeyFile /etc/pki/tls/private/nextcloud.key

    <Directory /var/www/html/nextcloud/>
        Options +FollowSymlinks
        AllowOverride All
        Require all granted

        <IfModule mod_dav.c>
            Dav off
        </IfModule>

        # Recommended security env vars
        SetEnv HOME /var/www/html/nextcloud
        SetEnv HTTP_HOME /var/www/html/nextcloud
    </Directory>

    # Logs
    ErrorLog /var/log/httpd/nextcloud_error.log
    CustomLog /var/log/httpd/nextcloud_access.log combined
</VirtualHost>
Install and verify SSL module, then restart Apache:
sudo dnf install mod_ssl -y
sudo httpd -M | grep ssl
sudo systemctl restart httpd
sudo apachectl configtest
Optional: Fix “ServerName” warning cleanly

Edit Apache main config:
sudo nano /etc/httpd/conf/httpd.conf
Uncomment and set:
ServerName IP_SERVER:80
7) Install/Enable End-to-End Encryption App (For Part IV)
If the app does not appear in the Nextcloud UI for your version, install it manually (SSH) and enable it via occ.
Prepare the environment:
# Clean up (optional)
sudo rm -f e2e.tar.gz

# Install git (if needed)
sudo dnf install git -y

# Clone into Nextcloud apps directory
cd /var/www/html/nextcloud/apps
sudo git clone https://github.com/nextcloud/end_to_end_encryption.git

# Permissions
sudo chown -R apache:apache end_to_end_encryption
sudo chmod -R 755 end_to_end_encryption

# Enable the app
cd /var/www/html/nextcloud
sudo -u apache php occ app:enable end_to_end_encryption
Verify if it’s enabled:
sudo -u apache php occ app:list | grep end_to_end
Part II - Server-Side Encryption (Nextcloud)
- Enable the Default Encryption Module app in Nextcloud.
- Go to Administration → Security and enable Server-side encryption.
- Log out and log back in with a user, then upload a file (e.g.,
server.txt). - On the server filesystem, verify the stored file is not readable in clear text.
- Verify the presence of encryption keys.
- Download the file via Nextcloud and confirm it becomes readable on the client side.
Part III - Client-Side Encryption (GPG before upload)
- Install Nextcloud Desktop client.
- Connect the client to the Nextcloud server.
- Encrypt a local file using GPG.
- Upload the encrypted file (e.g.,
client.txt.gpg) to Nextcloud. - Verify the server admin cannot read the stored file (it remains encrypted at rest).
Part IV - End-to-End Encryption (E2EE)
- Enable the End-to-End Encryption application.
- From a Nextcloud Desktop/Mobile client, create a protected (E2EE) folder.
- Add a file (e.g.,
e2e.txt) into that protected folder. - Verify directly on the server that the file is unreadable (encrypted).
Notes:
Why “log out and log back in” after enabling encryption? (P.II - Q.3)
When encryption features are enabled, Nextcloud may require a fresh session so user encryption keys/context are initialized and applied consistently for uploads and key management.

Checking encryption keys on the server (P.II - Q.5)
cd /var/www/html/nextcloud/data
find . -name "*.key" -o -name "*.privateKey"
Sources & References
The following resources were used as primary references for installation, configuration, and encryption concepts covered in this lab:
Official Nextcloud documentation
-
Installation on Linux (Admin Manual) — requirements, recommended layouts, and deployment guidance
Nextcloud Docs — Installation on Linux -
Server-side encryption details — how encryption works internally and what changes on disk
Nextcloud Docs — Server-side encryption details -
Encryption configuration (Admin Manual) — configuration options and operational notes
Nextcloud Docs — Encryption configuration
End-to-End Encryption (E2EE)
-
E2EE App (Nextcloud App Store) — app overview and ecosystem reference
Nextcloud App Store — End-to-End Encryption -
E2EE App source code (GitHub) — manual installation, version checks, issues, and troubleshooting
GitHub — nextcloud/end_to_end_encryption